Showing posts with label vsphere. Show all posts

Monday, April 24, 2023

Top 10 Features of vCenter: Elevate Your Virtualization Management

Top 10 Features of vCenter: Elevate Your Virtualization Management


The features mentioned are common to vCenter Server across multiple versions, including vCenter 6.x and 7.x. 


Introduction:

As the backbone of VMware's virtualization management ecosystem, vCenter Server is a powerful and comprehensive tool that simplifies data center operations. With a plethora of features designed to streamline and optimize virtual infrastructure management, vCenter is a must-have for any organization employing VMware virtualization technology. In this blog, we will explore the top 10 features that make vCenter the leading choice for managing virtualized environments.


Centralized Management:

vCenter Server provides a centralized platform for managing all your VMware vSphere environments, enabling you to monitor, manage, and optimize your virtual infrastructure from a single pane of glass. This centralized approach simplifies administrative tasks and eliminates the need to manage individual ESXi hosts directly.


Scalability and High Availability:

vCenter is built to scale with your organization's needs, supporting up to 10,000 powered-on virtual machines per vCenter instance. Additionally, vCenter High Availability (vCHA) ensures continuous availability and protection against hardware and software failures, ensuring your virtual infrastructure remains up and running.


vMotion and Storage vMotion:

vMotion enables live migration of virtual machines between ESXi hosts with zero downtime, ensuring uninterrupted business operations. Storage vMotion allows for the migration of virtual machine disk files between different storage types, improving storage utilization and avoiding potential performance bottlenecks.


Distributed Resource Scheduler (DRS):

DRS is an intelligent resource management feature that automatically balances workloads across ESXi hosts, ensuring optimal performance and utilization. DRS takes into account various factors like CPU, memory, and storage resources, making real-time decisions to distribute workloads efficiently.


vSphere High Availability (HA):

vSphere HA offers automatic failover and restart of virtual machines in the event of an ESXi host failure. This feature helps maintain high availability for your virtual infrastructure, minimizing downtime and ensuring business continuity.


vSphere Fault Tolerance (FT):

Fault Tolerance provides continuous availability for virtual machines by creating and maintaining a secondary VM on another host. If the primary VM fails, the secondary VM takes over instantly, providing a seamless failover experience with zero data loss.


vSAN (Virtual Storage Area Network):

vSAN is a software-defined storage solution that pools local storage devices across a cluster of ESXi hosts to create a highly available and scalable shared storage resource. vSAN simplifies storage management, reduces costs, and improves performance for your virtualized environment.


vSphere Update Manager (VUM):

VUM simplifies patching and updating your virtual infrastructure, ensuring that your ESXi hosts, virtual machines, and appliances are always up-to-date with the latest security patches and feature enhancements. With VUM, you can automate the entire patch management process and significantly reduce the risk of security vulnerabilities.


Role-Based Access Control (RBAC):

vCenter offers robust role-based access control, allowing you to define granular permissions for users and groups, ensuring that only authorized personnel can access and manage your virtual infrastructure. This feature helps maintain security and compliance in your organization.


vSphere Networking:

vCenter provides a suite of advanced networking features, including distributed switches, network I/O control, and load balancing, to optimize and secure your virtual infrastructure's network connectivity. These features enable better traffic management, enhanced security, and improved overall network performance.


Conclusion:

vCenter Server is an indispensable tool for organizations employing VMware virtualization technologies. With its powerful features and ease of use, vCenter simplifies the management and optimization of your virtual infrastructure. By implementing vCenter, you can ensure that your virtual environment remains efficient, resilient, and secure, allowing you to focus on driving innovation and growth for your business.

Wednesday, March 16, 2016

Delete All Snapshots Fails


Delete all snapshots Fails


Today I encountered an old misunderstood principle again. An admin had created several snapshots on a virtual machine. Several… well to be exact 15. All snapshots were larger than 20GB. When the VMFS volume, on which this VM was located, ran out of diskspace he decided to use the button “Delete All”, but within a couple of minutes the VMFS volume ran out of diskspace again. What happened?
Situation:
Snapshot 1 – 20GB
Snapshot 2 – 10GB
Snapshot 3 – 30GB
When you choose “delete all” the following will happen:
  1. Snapshot 2 will grow to 40GB at most
  2. Snapshot 1 will grow to 60GB at most
  3. Snapshot 1 will be committed to the original VMDK
  4. All snapshot files are deleted
In other words: Snapshot 3 is merged into Snapshot 2, Snapshot 2 is merged into Snapshot 1, Snapshot 1 is merged into the original flat.vmdk and afterwards all snapshot files are deleted. This means that if you want to delete all snapshots at once you will need around 130GB of free diskspace. So think twice when you press the “delete all” button.

Tuesday, December 22, 2015

Understanding NUMA and Virtual NUMA (vNUMA) in vSphere

Understanding NUMA and Virtual NUMA (vNUMA) in vSphere

Working with a recently, we had the experience of designing a solution involving a number of very large (average 12-16 vCPU) machines. In order to maximize the performance of these VMs, we needed to fully understand the intricacies of server resource management technologies NUMA and vNUMA. Failing to understand how they worked could have cost the customer performance gains that these technologies offer.

So what are NUMA and vNUMA, exactly? And how does the proper understanding of them benefit an administrator’s virtual environment?

So, what is NUMA?
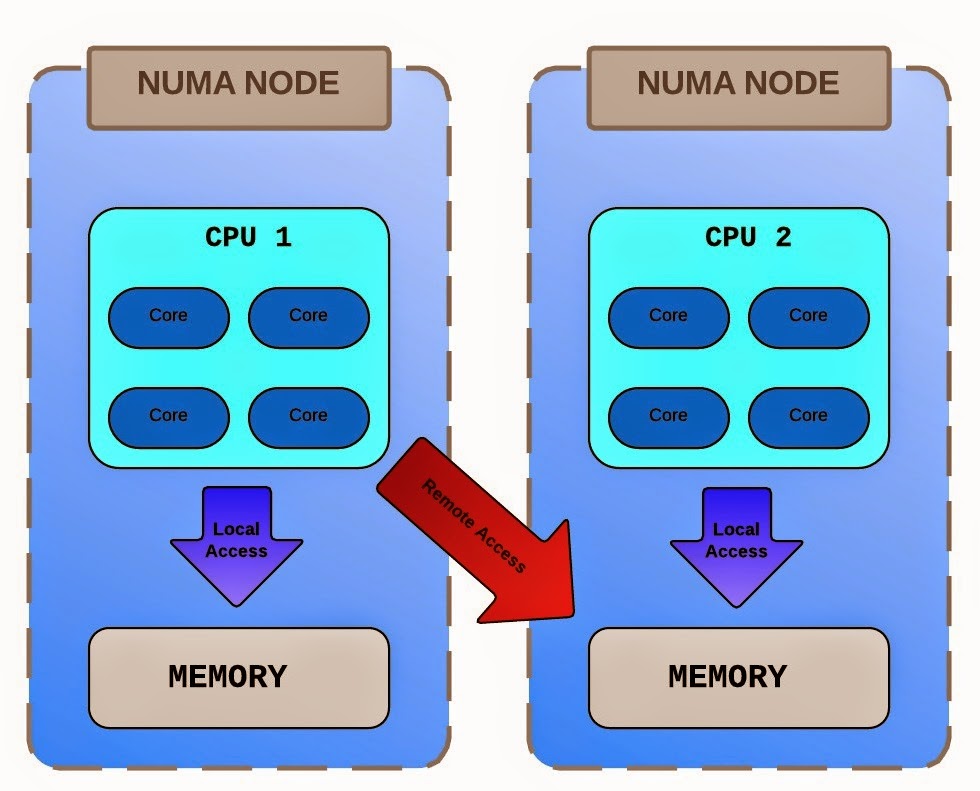
“NUMA,” which is short for “Non-Uniform Memory Access,” describes a system with more than one system bus. CPU resources and memory resources are grouped together into a “NUMA node.”

The memory in a NUMA node is thus much more easily accessed by an associated CPU. A CPU that needs to access memory in a different node (“Remote Access”) will experience much higher latency, and thus reduced application performance. 
NUMA is, in short, an alternative approach to server architecture that links several small, high-performing nodes together inside a single server case.


So, why NUMA?
So long as the memory and CPU being used falls within the bounds of the NUMA node, local communication within a NUMA node allows a CPU much faster access to memory than in an ordinary system layout. This is especially important in the multi-GHz era of today, when CPUs operate significantly faster than the memory they are using. NUMA helps keep CPUs from entering a stalled state, waiting for data, by allowing the fastest possible access to memory.

How do I determine the size of my NUMA nodes?
According to Microsoft, “In most cases you can determine your NUMA node boundaries by dividing the amount of physical RAM by the number of logical processors (cores).” This can be considered a very loose guideline. Further information on determining the specific setup for your NUMA nodes can be found here:
Virtual NUMA
ESX has been NUMA-aware since at least 2002, with VMware ESX Server 1.5 introducing memory management features to improve locality on NUMA hardware. This has worked well for placement of VMs and memory locality for resources being used by that virtual machine, particularly for virtual machines that are smaller than the NUMA node. Large VMs, however, could benefit from extra help when it comes to scheduling their applications.  
When enabled, vNUMA exposes a VM operating system to the physical NUMA topology. This allows for performance improvements within the VM by allowing the operating system and applications to take advantage of NUMA optimizations. This allows VMs to benefit from NUMA, even if the VM itself is larger than the physical size of the NUMA nodes.
A few quick points:

·         An administrator can adjust, enable, or disable vNUMA on VMs using advanced vNUMA controls.
·         If a VM has more than eight vCPUs, vNUMA is automatically enabled.
·         If you enable CPU HotAdd, vNUMA is disabled.
See section 14, “Using NUMA Systems with ESXi” in the vSphere Resource Management Guide for more details.


What happens regarding vNUMA during a vMotion between hosts?
A VM’s vNUMA topology will mimic the topology of the host on which it is initally placed; this topology does not adjust if a VM moves to a different host unless the VM is restarted.  This is another excellent argument for keeping your hardware consistent within an ESXi cluster, as moving the VM to an ESXi host with a different NUMA topology could result in lost CPU/Memory locality and reduced performance.

For more information, consult the "Guest Operating Systems" section of the VMware Performance Best Practices guide.


In conclusion
Regardless of your virtualization platform, NUMA plays an important part in understanding performance within a virtual environment. VMware, in ESXi versions 5.0 and beyond, has extended the capabilities of large VMs by intelligent NUMA scheduling and improving VM-level optimization with vNUMA. It is important to understand both your NUMA and vNUMA topologies when sizing your virtual machines.

Friday, May 23, 2014

My first VMUG experience -- Los Angeles May 22nd 2014

On Thursday, May 22nd 2014, I attended my very first VMUG.  The meeting took place in downtown Los Angeles at Ace Hotel in the Segovia Hall.


Over the years, I've been to quite a bit of events from various vendors or VARS. VMUG is quite different. For those of you who are not familiar with VMUG, it is a VMware User Group that is independent, global, customer-led organization created to maximize members' use of VMware and partner solutions through knowledge sharing, training, collaboration, and events. Membership is free. More information and membership application can be found on www.vmug.com.


In addition to the free membership, you can sign up to be a VMUG Advantage member and receive pretty good discounts on certification exams, books, software, VMworld, etc. 

The event that I attended was a mixture of sponsor and community based sessions.VMUG, being VMware’s community outreach program that bridges the gap between the users (or anyone interested) and the vendor itself. Contrary to what one might think, VMUG is run by the users themselves and receives the backing not only from VMware, but many other vendors such as Symantec, Dell, Puppet Labs, PRTG Network Monitor, Veeam etc. and provide sponsorship to the events. The events come in a multitude of varieties, ranging from User Group Meetings, (Online) Virtual Training and the big User Conferences.

The sponsors for this event were PureStorage and VMware and following is the agenda.


Meeting Highlights:

  • Pure Storage Presentation: Rise of All Flash Enterprise
  • Member Presentation: Automation Tools – Anthony Chow
  • Presentation: Automation - The End of Your Career as You Know It
  • Q&A and Networking


Upon my late arrival, I tried to grab an available seat without luck. So I hung around the back area for a bit where I ran into James Reale of VMware. It was such a surprise and pleasure to see him again. I eventually snagged some chairs but was only able to place them where a pillar partially obstructed the view. I suggest arrival on time to get good seats especially if you want to see what is going on up front.

Add caption


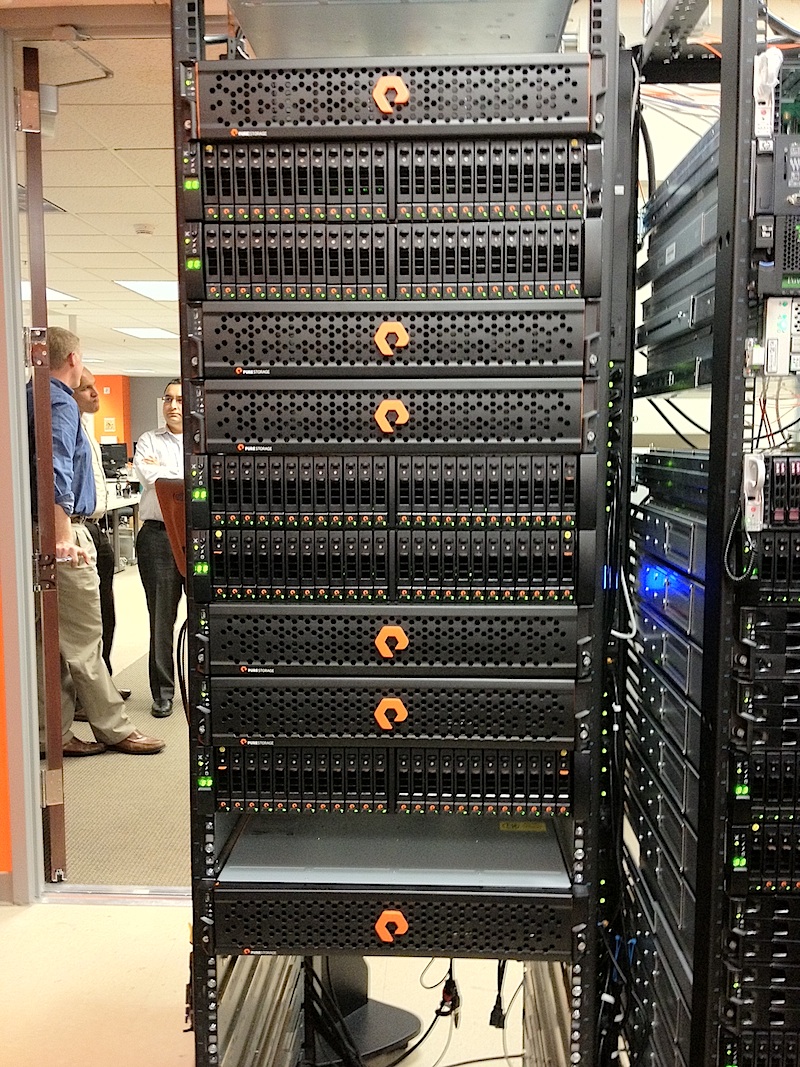
The first session was by PureStorage, where they discussed an all-flash storage array and showcased the user interface to manage the device. I have to admit I arrived to the meeting towards the end of this presentation. So I can't really report much about it.  Fortunately, I'd worked with a demo unit iabout a year ago. A cool feature I remember is the device encrypts all data on the system using self-encrypting SSD and AES-256 encryption and rather than storing the key in a small amount of non-volatile memory on the controller, it encodes the key with dispersal codes and then spreads it across all the SSDs in the systems; recovering the key requires half plus one of the SSDs. This means encryption at rest is good not just for drive disposal but for systems in transit-- as long as no more than half of the SSDs are shipped via any one interceptable route.  Another feature is that the storage device "phones-home" every 30 minutes.


This was followed by Tom Chow of Alcatel/Lucent where he discussed automation tools such as Puppet. Tom went over differences and similarities among the tools out there. Although the topics of Puppet, Chef, Ansible, Salt, etc. are very huge in content and matter, Tom was able to give us the broad strokes and exposure.


The next session was presented by Sam Hernandez of VMware. The topic was automation. It was a 3 or 5 slide presentation to guide the topic and conversation surrounding automation of daily tasks and therefore freeing up admin time for something more interesting.


Finally, there was a Q&A session with the panel consisting of VMware heavy-hitters from the industry.


From left to right: (Naomi Sullivan, Joe Cook, Charu Chaubal, Sam Hernandez)


Midway through the conference we took a break and delicious food/dishes were served. A selection of steaks, grilled chicken, couscous, lemon pasta, brown rice mix, potatoes, and others that I can't quite remember were served along with vBeers and vWine (remember don't drink and drive).  Yum!

Richard Avila, Nelson Lopez, Martin Perez


The close of the conference ended with drawings for several giveaways including a Go Pro 3. My colleague Nelson put his card in draw the last minute and ended up winning the big prize of the evening.


This is what the t-shirt SWAG consisted of for this conference:


The SWAG pictured below is a smart phone holder/mount that flips out when in use and flips down for storing. To me, it looked like a giant pill splitter. Asking my colleagues if they got their giant pill splitter got a lot of chuckles from other guys who overheard.


In closing if you have not been to a VMUG and you can find the time, get yourself to the next conference and see what it’s all about. 

If you're willing to walk up to someone and say hello, they are likely to respond and it’s those networking conversations where the hidden value of the VMUG really lies.


Thanks to the Los Angeles VMUG comittee for putting on a great meeting and I will hopefully be seeing you all again in VMUG conference. Special thanks to Martin Perez for helping my colleagues Nelson Lopez, Richard Avila, and me feel welcome and at our first VMUG.


yep, that's me, John Mendoza

https://www.facebook.com/LosAngelesVmug
http://www.vmug.com/index.php?mo=cm&op=ld&fid=217&gid=121


Monday, May 12, 2014

VMKcore partitions on ESXi hosts with non-local Disks

When running ESXi from local storage, a VMKcore partition is created during install.
If your ESXi Host 5.0/5.1/5.5 experiences a Purple Screen Of Death (PSOD), it hopefully creates a diagsnostic coredump. This coredump contains useful information for root cause analysis.

When a PSOD should occur, you can retrieve the dump information using the esxcfg-dumppart command: esxcfg-dumppart –log <ESX dump file> or esxcfg-dumppart –L <ESX dump file> from a shell session.

If there is no available disk partition for a coredump on your ESXi host, such as in Auto-Deploy or "USB/Memcard installs" where there is no local disks, you will get the following error message:

“No vmkcore disk partition is available and no network coredump server has been configured. Host core dumps cannot be saved.”

In such configuration cases, it is better to move the core dumps to a datastore. This has to be a VMFS volume, which rules out NFS. Since the vmkcore dump partition has to be available at boot time, software iSCSI is ruled out too. Only hardware iSCSI or FC LUNs are possible.

Setting VMKcore partition
The following steps are needed to configure the vmkcore partition. In my example I’m using a 10GB LUN provisioned by iSCSI.
Create the LUN
On my shared storage I created a 10GB iSCSI target and assigned it to my ESXi host. Then on the ESXi host you add the iSCSI target. Do a rescan and then add the iSCSI target like you would normally add a new datastore by pressing the “Add Storage” option in the Storage menu on the configuration tab. Choose to add a Disk/LUN and name it something like: vmkcore-esx01. After a rescan the LUN should be available in your storage view.
Change the partition type
Now the datastore needs to have the disk type changed. To do this you will have to logon to the ESXi host using tech support mode. After you are logged in, list all partitions using the fdisk -l command. You will now see a list of partitions in which you should search for your 10GB disk. In my case it looked like:
Disk /dev/disks/naa.5000144f33903730: 10.7 GB, 10737418240 bytes
255 heads, 63 sectors/track, 1305 cylinders
Units = cylinders of 16065 * 512 = 8225280 bytes
Now to change the partition type, run fdisk /dev/disks/naa.5000144f33903730 (copy it from your fdisk list). In fdisk hit “t” to change the partition’s ID, then hit “fc” to change the partition type to VMKcore. Now hit “w” to write the partition table and exit fdisk.
Set and activate the partition
The last step is now to tell ESXi to use a new vmkcore partition using the following command. First we double check for suitable vmkcore partitions:
esxcfg-dumppart –f
If the fdisk action went well, you should now see the /dev/disks/naa.5000144f33903730 partition again in the list. To set the partition use the following command:
esxcfg-dumppart -s naa.5000144f33903730:1
Now, after playing with this in my lab for over 2 hours I received the message: “Unable to set dump partition naa.5000144f33903730:1. Error Message was: Unsupported disk type: Software iSCSI LUNs are not supported”. So this last part is flying blind on the docs.
Last step is now to activate the partition using the following command:
esxcfg-dumppart -a naa.5000144f33903730:1
Reading the dump file
After a PSOD has occurred log in to the ESXi host using Tech Support mode. First step is to list the dump partition that is active and then copy the dump to a different volume and extract the logs.
-          esxcfg-dumppart –l
-          esxcfg-dumppart –copy –devname /vmfs/devices/disks/naa.xxxxx:x –newonly –zdumpname /vmfs/volumes/nfs-StorCent03/esxdump/esxdump
-          cd /vmfs/volumes/nfs-StorCent03/esxdump/esxdump
-          esxcfg-dumppart –L /vmfs/volumes/nfs-StorCent03/esxdump/esxdump
You will now find a vmkernel-log.1 file that you can use to examine why the PSOD happened.


Other useful shell or ssh console commands related to this issue:

You can display the currently active diagnostic partition with the following command (via console session to your ESXi host):
        esxcli system coredump partition get
You will see an output like:
coredump1
If you want your ESXi host to select and activate an accessible partition automatically, use the following command (you need a partition with at least 100 MB of free space):
         esxcli system coredump partition set –enable=true –smart
If you want to define a dedicated partition for the diagnostic coredump use these commands:
First list all accessible diagnostic partitions:
          esxcli system coredump partition list
You will see an output like:
coredump2
Now specify a partition you want:
          esxcli system coredump partition set –partition=”device_path_name”
In this example we configure mpx.vmhba32:C0:T0:L0:7 as a coredump partition:
And now we activate the specified partition using:
          esxcli system coredump partition set –enable true
To validate our configuration use:
          esxcli system coredump partition list
We should get something like:
coredump4


The following is VMWare's recommendation on diagnostic partitions:

A 100MB diagnostic partition for each host is recommended. If more than one ESX/ESXi host uses the same LUN as the diagnostic partition, that LUN must be zoned so that all the ESX/ESXi host can access it. Each host needs 100MB of space, so the size of the LUN determines how many servers can share it. Each ESX/ESXi host is mapped to a diagnostic slot. VMware recommends at least 16 slots (1600MB) of disk space if servers share a diagnostic partition. You can set up a SAN LUN with FibreChannel or hardware iSCSI. SAN LUNs accessed through a software iSCSI initiator are not supported.

Caution If two hosts that share a diagnostic partition fail and save core dumps to the same slot, the core dumps might be lost. To collect core dump data, reboot a host and extract log files immediately after the host fails. If another host fails before you collect the diagnostic data of the first host, the second host does not save the core dump.

More information can be found from VMWare's vSphere 5 document center here:
http://pubs.vmware.com/vsphere-50/index.jsp?topic=%2Fcom.vmware.wssdk.pg.doc_50%2FPG_Ch8_Storage.10.10.html


Friday, April 11, 2014

HOWTO: Re-enable VMware Console copy/paste functionality

HOWTO: Re-enable VMware Console copy/paste functionality

So, if you’re like me, you copy and paste a lot fro your VM consoles – or *want* to.  It kind of drove me nuts for a while, as I was certain I’d done this in the past, hit or miss.  Turns out it’s a feature that got disabled by default after vSphere 4.1 as a “security concern”. 
Now, I can understand why or how it could be a concern, but let’s be realistic:
  • A user who has access to the console, is likely a Domain Admin – or at least a vSphere Admin, unless roles have been delegated

  • We likely have DEV/TEST environments, and/or DMZ’s that have VM’s that can’t easily see, browse, RDP, 
  • etc, to your workstation or other networks.

  • Copy and paste is *good*, darn it!


By far the best option for me is the second option, which enables it for all VM’s on a host:
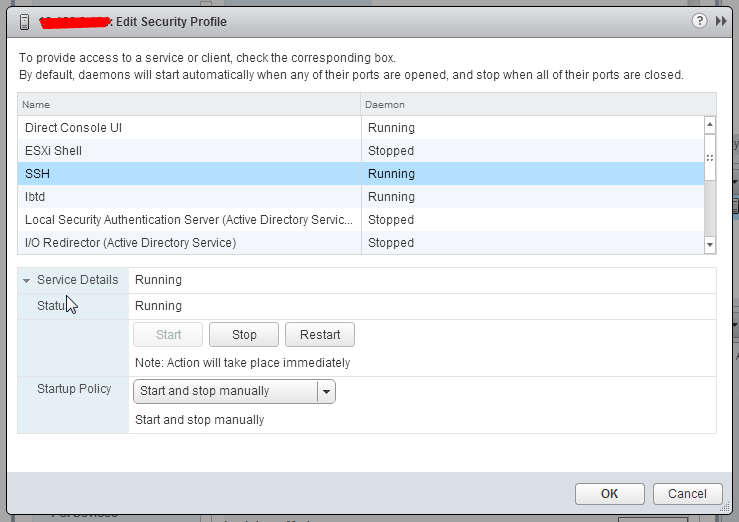
First ensure SSH server is running on the ESXi host.

Then make sure the firewall on the ESXi host will allow SSH connections

  1. Log in to the ESX/ESXi host as a root user.


  1. Take a backup of the /etc/vmware/settings file.


  1. Open the /etc/vmware/settings file using a text editor.


  1. Add these entries to the file: isolation.tools.copy.disable="FALSE" 
    isolation.tools.paste.disable="FALSE"


  1. Save and close the file. 


The Copy and Paste options are only enabled when the virtual machines restart or resume the next time or shutdown and power-on the virtual machine for changes to take effect
It should be noted that these changes will not remain after a host upgrade.  So you may need these to be part of your scripting, use the vMA, or my preference, embed it in your kickstart.cfg files you use for installation customization.